Get a package from aptitude
sudo apt-get install ros-groovy-joystick-drivers
Follow this tutorial, start from topic "1.2 Configure the Joystick" onward, to configure a permission.
To start using the node, just run
rosrun joy joy_node
When node is running, you should be able to see topic named "/joy". To see data flow, just run
rostopic echo /joy
Tested using Xbox360 joystick for Window, on Ubuntu 12.04 running ROS Groovy.
Friday, June 28, 2013

Wednesday, March 6, 2013
Backup script
To make life a bit easier a backup script is attached here (at the end of this page) to make a full-system backup. The script will do the following:
- It will empty your trash.
- make an list of files and folder that to don't want to backup (an exclude_file mentioned as above). Files ended with .bag, .mpg, .mpeg, .avi, .png will be exclude and also everything in /tmp and /download folder.
- then it will create a destination folder at your argument directory.
Usage of the script
chmod +x fullbackup.sh
./fullbackup /home/golfcar
After backup finish, you will see a folder named like golfcart-master-010313.tgz where "golfcart-master" is your hostname and "010313" is a backup date (01/03/2013).
The script can be download from here link
https://help.ubuntu.com/community/BackupYourSystem/TAR
https://sites.google.com/site/fmautonomy/private/documentation/backups
Thursday, December 13, 2012
DBSCAN
I
DBSCAN is short from Density-Based Spatial Clustering of Application with Noise (reference from wiki : DBSCAN)
Explanation in plain english
DBSCAN requires two parameters: (eps) and the minimum number of points required to form a cluster
(minPts). It starts with an arbitrary starting point that has not been
visited. This point's -neighborhood
is retrieved, and if it contains sufficiently many points, a cluster is
started. Otherwise, the point is labeled as noise. Note that this point
might later be found in a sufficiently sized -environment of a different point and hence be made part of a cluster.
(eps) and the minimum number of points required to form a cluster
(minPts). It starts with an arbitrary starting point that has not been
visited. This point's -neighborhood
is retrieved, and if it contains sufficiently many points, a cluster is
started. Otherwise, the point is labeled as noise. Note that this point
might later be found in a sufficiently sized -environment of a different point and hence be made part of a cluster.
If a point is found to be a dense part of a cluster, its-neighborhood is also part of that cluster. Hence, all points that are found within the -neighborhood are added, as is their own -neighborhood
when they are also dense. This process continues until the
density-connected cluster is completely found. Then, a new unvisited
point is retrieved and processed, leading to the discovery of a further
cluster or noise.
Here is a code in Python
was looking for the way to cluster a points, grouping a neighbourhood points together, but since I don't know number clusters in the data and therefore the k-mean clustering can't be use. After do some search on Google and our good friend Wikipedia I come across this alternative clustering algorithm. DBSCAN is short from Density-Based Spatial Clustering of Application with Noise (reference from wiki : DBSCAN)
Explanation in plain english
DBSCAN requires two parameters:
(eps) and the minimum number of points required to form a cluster
(minPts). It starts with an arbitrary starting point that has not been
visited. This point's -neighborhood
is retrieved, and if it contains sufficiently many points, a cluster is
started. Otherwise, the point is labeled as noise. Note that this point
might later be found in a sufficiently sized -environment of a different point and hence be made part of a cluster.If a point is found to be a dense part of a cluster, its
-neighborhood is also part of that cluster. Hence, all points that are found within the -neighborhood are added, as is their own -neighborhood
when they are also dense. This process continues until the
density-connected cluster is completely found. Then, a new unvisited
point is retrieved and processed, leading to the discovery of a further
cluster or noise. Here is a code in Python
 #! /usr/bin/python
 from math import sqrt, pow

 class DBSCAN:
 #Density-Based Spatial Clustering of Application with Noise -> http://en.wikipedia.org/wiki/DBSCAN
   def __init__(self):
     self.name = 'DBSCAN'
     self.DB = [] #Database
     self.esp = 4 #neighborhood distance for search
     self.MinPts = 2 #minimum number of points required to form a cluster
     self.cluster_inx = -1
     self.cluster = []

   def DBSCAN(self):
     for i in range(len(self.DB)):
       p_tmp = self.DB[i]
       if (not p_tmp.visited):
         #for each unvisited point P in dataset
         p_tmp.visited = True
         NeighborPts = self.regionQuery(p_tmp)
         if(len(NeighborPts) < self.MinPts):
           #that point is a noise
           p_tmp.isnoise = True
           print p_tmp.show(), 'is a noise'
         else:
           self.cluster.append([])
           self.cluster_inx = self.cluster_inx + 1
           self.expandCluster(p_tmp, NeighborPts)

   def expandCluster(self, P, neighbor_points):
     self.cluster[self.cluster_inx].append(P)
     iterator = iter(neighbor_points)
     while True:
       try:
         npoint_tmp = iterator.next()
       except StopIteration:
         # StopIteration exception is raised after last element
         break
       if (not npoint_tmp.visited):
         #for each point P' in NeighborPts
         npoint_tmp.visited = True
         NeighborPts_ = self.regionQuery(npoint_tmp)
         if (len(NeighborPts_) >= self.MinPts):
           for j in range(len(NeighborPts_)):
             neighbor_points.append(NeighborPts_[j])
       if (not self.checkMembership(npoint_tmp)):
         #if P' is not yet member of any cluster
         self.cluster[self.cluster_inx].append(npoint_tmp)
       else:
         print npoint_tmp.show(), 'is belonged to some cluster'

   def checkMembership(self, P):
     #will return True if point is belonged to some cluster
     ismember = False
     for i in range(len(self.cluster)):
       for j in range(len(self.cluster[i])):
         if (P.x == self.cluster[i][j].x and P.y == self.cluster[i][j].y):
           ismember = True
     return ismember

   def regionQuery(self, P):
   #return all points within P's eps-neighborhood, except itself
     pointInRegion = []
     for i in range(len(self.DB)):
       p_tmp = self.DB[i]
       if (self.dist(P, p_tmp) < self.esp and P.x != p_tmp.x and P.y != p_tmp.y):
         pointInRegion.append(p_tmp)
     return pointInRegion

   def dist(self, p1, p2):
   #return distance between two point
     dx = (p1.x - p2.x)
     dy = (p1.y - p2.y)
     return sqrt(pow(dx,2) + pow(dy,2))

 class Point:
   def __init__(self, x = 0, y = 0, visited = False, isnoise = False):
     self.x = x
     self.y = y
     self.visited = False
     self.isnoise = False

   def show(self):
     return self.x, self.y

 if __name__=='__main__':
   #this is a mocking data just for test
   vecPoint = [Point(11,3), Point(10,4), Point(11,5), Point(12,4), Point(13,5), Point(12,6), Point(6,10), Point(8,10), Point(5,12), Point(7,12)]

   #Create object
   dbScan = DBSCAN()
   #Load data into object
   dbScan.DB = vecPoint;
   #Do clustering
   dbScan.DBSCAN()
   #Show result cluster
   for i in range(len(dbScan.cluster)):
     print 'Cluster: ', i
     for j in range(len(dbScan.cluster[i])):
       print dbScan.cluster[i][j].show()
Sunday, November 25, 2012
tele-operate the Pioneer
I make some write-up about tele-operation code I have found somewhere I can't remember. May come handy later I guess.
https://sites.google.com/site/poonweb/robotics/tele-operation
I don't know how to put a code nicely on blogger, so I put it at my (long untouched) Google site.
https://sites.google.com/site/poonweb/robotics/tele-operation
I don't know how to put a code nicely on blogger, so I put it at my (long untouched) Google site.
Nice ROS installation guide
I have come across this site showing guide on ROS installation made easy, which really made it easy with step-by-step to install ROS. Should be very useful for anyone who looking for a "sure way" to install ROS on Ubuntu.
There site also have many interesting articles as well!
There site also have many interesting articles as well!
Tuesday, October 2, 2012
NASA Select Advanced Robotics Projects for Development
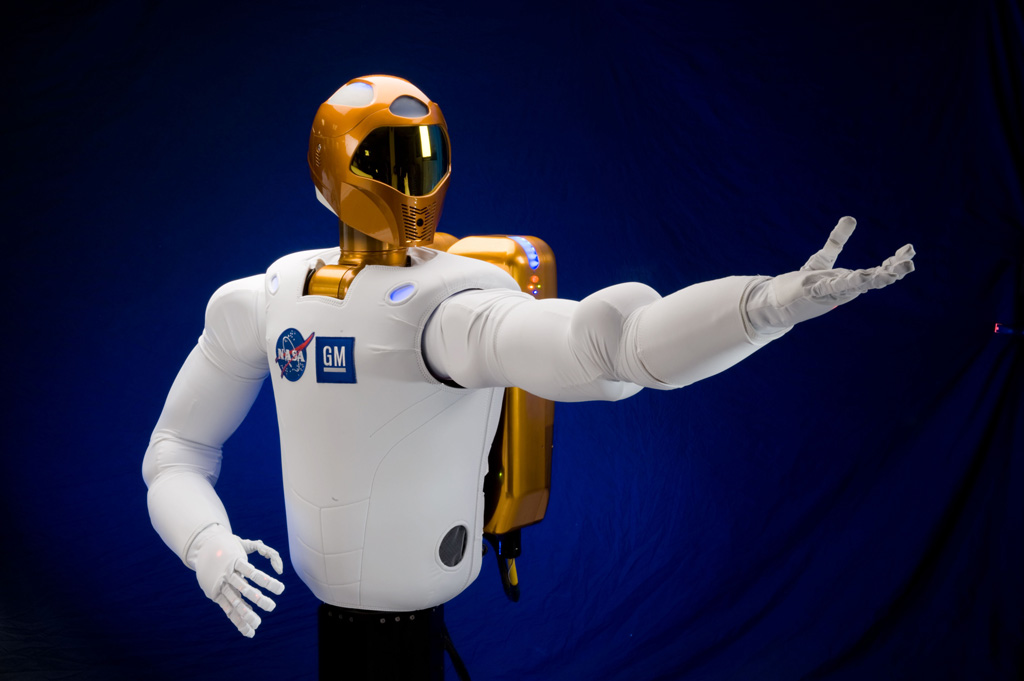
NASA ได้เลือก 8 โปรเจกต์ที่เกี่ยวข้องกับเทคโนโลยีหุ่นยนต์เพื่อที่จะนำไปใช้ในภารกิจการสำรวจอวกาศในอนาคต โปรเจกต์ที่ได้รับการคัดเลือกมามีตั้งแต่โปรเจกต์ที่จะพัฒนาความสามารถของหุ่นยนต์สำรวจ (robotic planetary rovers) ไปจนถึงหุ่นยนต์เสมือนมนุษย์ (humanoid robotics systems)
ตัวอย่างหนึ่งของหุ่นยนต์ที่ทำงานเคียงข้างและคอยช่วยเหลือมนุษย์ในอวกาศก็คือ Robonaut หุ่นยนต์คล้ายมนุษย์ที่มีร่างกายแค่ส่วนบนของ NASA เป็นหุ่นยนต์ซึ่งนับเป็นหนึ่งในสมาชิกบนสถานีอวกาศนานาชาติที่ได้รับการทดสอบการใช้งานจริง และเริ่มช่วยเหลือการทำงานของนักบินอวกาศแล้ว ทำให้นักบินอวกาศมีเวลาที่จะนำไปใช้กับงานในห้องทดลองซึ่งมีความซับซ้อนและสำคัญกว่านานขึ้น
จุดมุ่งหมายของ NASA ที่ต้องการพัฒนาขีดความสามารถของหุ่นยนต์นั้นก็เพื่อต้องการให้หุ่นยนต์สามารถทำงานเคียงข้างกับมนุษย์ทั้งบนโลกและในอวกาศ ซึ่งจะทำให้มนุษย์ทำงานได้อย่างมีประสิทธิภาพสูงสุด ลดข้อจำกัดด้านความสามารถของมนุษย์ และปรับปรุงเรื่องความปลอดภัยในการทำงานให้มากขึ้น
รายชื่อ 8 โปรเจกต์ที่ได้รับการสนับสนุนโดย NASA มีดังต่อไปนี้
- หุ่นยนต์อวตาร (หุ่นยนต์ที่เคลื่อนไหวตามมนุษย์ผู้ควบคุมระยะไกล), ”Toward Human Avatar Robots for Co-Exploration of Hazardous Environments,” J. Pratt, principal investigator, Florida Institute of Human Machine Cognition, Pensacola
- ระบบขาเทียม, ”A Novel Powered Leg Prosthesis Simulator for Sensing and Control Development,” H. Herr, principal investigator, Massachusetts Institute of Technology, Cambridge
- ระบบทำนายลักษณะพื้นผิวที่มีความอันตรายต่อหุ่นยนต์สำรวจ, “Long-range Prediction of Non-Geometric Terrain Hazards for Reliable Planetary Rover Traverse,” R. Whittaker, principal investigator, Carnegie Mellon University, Pittsburgh
- ผิวจำลองที่มีความสามารถในการรับรู้สำหรับหุ่นยนต์, ”Active Skins for Simplified Tactile Feedback in Robotics,” S. Bergbreiter, principal investigator, University of Maryland, College Park
- ระบบส่งกำลังสำหรับหุ่นยนต์เสมือนมนุษย์, “Actuators for Safe, Strong and Efficient Humanoid Robots,” S. Pekarek, principal investigator, Purdue University
- ระบบควบคุมหุ่นยนต์ระยะไกล, ”Whole-body Telemanipulation of the Dreamer Humanoid Robot on Rough Terrains Using Hand Exoskeleton (EXODREAM),” L. Sentis, principal investigator, University of Texas at Austin
- หุ่นยนต์แบบบาง ๆ ยาว ๆ, ”Long, Thin Continuum Robots for Space Applications,” I. Walker, principal investigator, Clemson University, Clemson, S.C.
- ระบบควบคุมสำหรับหยิบจับวัตถุอ่อนนิ่ม, ”Manipulating Flexible Materials Using Sparse Coding,” R. Platt, principal investigator, State University of New York, Buffalo
NASA มีประวัติอันยาวนานในการพัฒนาเทคโนโลยีล้ำสมัยสำหรับการใช้งานในอวกาศ นอกจากนี้ NASA ยังได้ร่วมมือกับภาคเอกชนภายในสหรัฐฯ มหาวิทยาลัย และภาครัฐฯ ในการถ่ายทอดเทคโนโลยีเหล่านี้กลับสู่ภาคอุตสาหกรรมของสหรัฐฯ เพื่อเพิ่มความสามารถด้านการผลิต และการแข่งขันด้านเศรษฐกิจอีกด้วย
จากข่าวนี้เราจะเห็นได้ว่า NASA ได้เน้นความสำคัญไปที่การรับรู้และการควบคุมระยะไกลนั่นเอง
อ้างอิง
NASA
Wednesday, September 19, 2012
Set maximum screen size, Ubuntu 12.04
I just setup my work station at my new workplace and found out that my Ubuntu 12.04 with ATI graphic card cannot output dual screen (two 1600x900) with message indicate that it exceed maximum screen size (1600x1600). After doing some search I found a fix.
I have to configure file xorg.conf in ~/etc/X11/ folder by adding subsection "display" part is section "screen" as follow (character in green):
I have to configure file xorg.conf in ~/etc/X11/ folder by adding subsection "display" part is section "screen" as follow (character in green):
[~/etc/X11/xorg.conf]
Section "Screen"
Identifier "Default Screen"Above code will change maximum size to 3600x3600 larger than what I really want (but it's fine). Save and reboot the system and I can use dual-monitor as I want.
DefaultDepth 24
SubSection "Display"
Virtual 3600 3600
EndSubSection
EndSection
Section "Module"
Load "glx"
EndSection
Subscribe to:
Posts (Atom)